Migrating Dual M.2 Drives
First of all, let’s be clear. If you have an m.2 NVMe docks that lets you run
f3probe without incident, you should use it. I don’t, so I didn’t. And
consequently, I had to put some more work in.
A Word About eBay Flash
Do not trust SSDs you get from Amazon or ebay. SSD capacity fraud is rampant,
so rolling the dice on a too-good-to-be-true deal just isn’t worth feeding the
scammers for. Before installing your new SSDs in the target machine, test them
with f3probe (or the rest of the f3 suite, if you prefer). I got lucky with
only one quirky drive out of eight, but you might not get so lucky.
I had to use the target systems themselves to check the drives, since that was the hardware I could get.
A word about BIOS settings
As you may recall from my last post, I recently acquired some enterprise flash, and now I need to install it in my servers.
Bit-for-bit data copying (with limits)
But, doing so without losing data is another story. Quite an involved one, since I had to test my new BIOS settings. And oh yeah, I was trying to use netboot to minimize the number of times I needed to juggle a USB key.
So here’s what my process for the first node looked like:
- Shutdown node
- Replace old NVME B with new NVME C
- Boot into gparted
- Test new NVME C via
f3probe - Copy the bits over (
dd) from old NVME A to new NVME C - Remove old NVME A, unplug network
- Make sure server boots into proxmox via new NVME C [ <– Expected fail step! ]
- Replace new NVME C with old NVME B, add in new NVME D
- Connect network
- boot into gparted
- Test new NVME D via
f3probe - Copy the bits over (
dd) from old NVME B to new NVME D - Remove old NVME B, unplug network
- Ensure proxmox boots via new NVME D
- Install new NVME C
- Boot back into proxmox
- Double check partition tables on new NVME C and new NVME D
- Plug network back in
- Allow cluster to recover
As expected, booting into proxmox on new NVME “C” drive fell apart. That’s when I got some help to figure out the BIOS settings from the last post.
With the bios settings tweaked and a ventoy loaded with gparted live (and some other images), I kept the network cables unplugged the entire time I was working on the second node. And then discovered that btrfs won’t boot a mirror without without both halves. For the third node, the process looked a little more like this:
- Shutdown node
- Unplug Networking (AND LEAVE DISCONNECTED)
- Replace old NVME B with new NVME C
- Reslot server + plug in Ventoy & 1gbps network
- Fix BIOS Settings
- Boot into gparted
- Test new NVME C via
f3probe - Copy the bits over (
dd) from old NVME A to new NVME C - Replace new NVME C with old NVME B, add in new NVME D
- Reslot server + plug in Ventoy & 1gbps network
- boot into gparted
- Test new NVME D via
f3probe - Copy the bits over (
dd) from old NVME B to new NVME D - Replace old NVME B with new NVME C
- Reslot server + plug in all network cables
- Boot back into proxmox
- Double check partition tables on new NVME C and new NVME D
- Plug network back in
- Allow cluster to recover
But, you still have to test the bios settings with both proxmox and netboot before you strip out the testing step.
Overall, this stage of the process was time-consuming, but straightforward.
Resizing Partitions
This stage, on the other hand, was not simple.
On the original 1TB drives, there was not any free space to spare. But if I wanted to make full use of the new 2TB drives, I had to make space. Back into gparted we go!
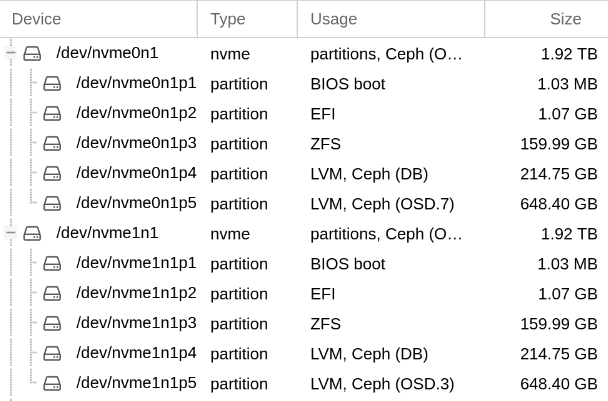
Here’s the partition table when I started:

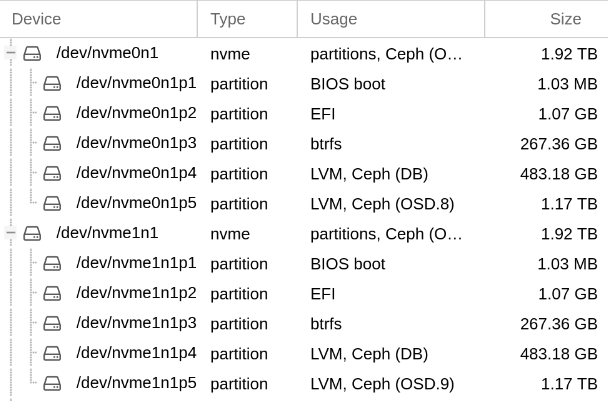
And where I was aiming to get to:

First node was basically guess-and-check. I was still figuring out sizes and offsets, so I just made it up as I went, applying every operations one at a time, and rebooting as necessary.
Things I learned:
- LVM partitions need to be deactivated to be able to move them.
- If you chain too many LVM operations together, gparted is likely to get confused. Do one or two non-overlapping operations at a time, and reboot it necessary.
- ZFS might need some coaxing to actually use its new space
- If Ceph in proxmox doesn’t pick up on the new partition size, run this command,
then restart the OSD:
lvextend -l 100%PVS /dev/...
Final process I wound up with for Node 3:
- Boot into gparted live disk
- Per drive (apply each step, reboot as needed):
- Deactivate p5 & Move p5 to the end of the drive
- Deactivate p4 & Move p4 starting at 250GiB, size 450 GiB
- Resize p3 to take up all available space
- Deactivate p5 & Resize p5 to take up all available space
- Run check on any partitions that aren’t taking up their full space
- Reboot into proxmox
- If needed, reboot HDD OSDs if their DB is not the right size
End
And with that, I had my freshly upgraded servers. Time to benchmark the new ceph setup!